Sunday, October 30, 2016

DECISIONS, DECISIONS

I must admit, the controller fire has knocked some of the wind out of my sails on the Electric Fiero Project. The panel meters were finally working and the plan was to install the third module before the Drive Electric Day at Easton Town Center in Columbus, OH. 

Currently the Better Place battery modules are listed on Craig's List and I am considering several options to power the Fiero. 

 1


The Warp 9 needs a major rebuild and honestly, I was never quite satisfied with a DC motor that did not have any regen capabilities, so am strongly considering the HPEVS AC51 and Curtis 1239-8501 controller. The motor would be a direct bolt-on replacement and it's shorter dimension would allow for easier installation into the motor cradle. Also the efficiency would go from the 78% of the Warp 9 to 88% for the AC motor.

Electric-Car-AC-Motor-Controller-Combo-HPEVS-AC51-Curtis-144-Volt-Kit-EV-West

HPEVS AC 51

If the Better Place modules do not sell for a profit, I will keep them but if I can make a reasonable profit, will sell them and go with CALB LiFePo4 batteries.  This would allow me to get more cells in the back of the car and be able to arrange them so the cradle could be dropped without removing the batteries first. 

Hopefully work on reassembling the Fiero can begin this spring.


Sunday, September 4, 2016

BATTERY REMOVAL

Last night I finally had the time to jack up the Fiero and remove all of the fasteners holding the battery module to the rack and even got four of them out of the car. To my surprise, all of the modules that were removed were still at 8.06-8.08 volts. 


FIERO ON JACK STANDS


FIRST 8 CELLS REMOVED


FIRST 4 CELLS REMOVED


VOLTAGE AT 8.06 VOLTS

The voltage reading was actually higher than expected as they were originally charged to this level but the car had been driven for 6 miles then went through a short period high current draw when the controller blew. The car was trying to move against the parking brake and then the brakes when I applied them so the amp draw must have been over 700 amps for a couple of seconds. Also puzzling, was that the fuse did not blow but it still has continuity.

All of the cells have been removed and the rack rinsed off, so the next step will be to remove the cradle.

When the new motor is mounted, adjustable coil over struts, new transmission mounts, and cradle modifications will be made to that the ride height can be adjusted, and the battery modules can be mounted lower. Also the transaxle is going to a transmission shop to be gone over and a new shift cable will be installed.

Also, a new AC motor and controller is going to be purchased and am trying to calculate the most cost effective way to go. This will take into consideration the cost of the components and the efficiency of the set up. The AC 50 or 51 would be the easiest to install and probably the least expensive but upon looking at the specs, is only around 88% efficient. I would think there are setups in the low to mid 90% efficiency available now.

More to come!

Tuesday, August 30, 2016

ALIEN MOTION BATTERY SALE


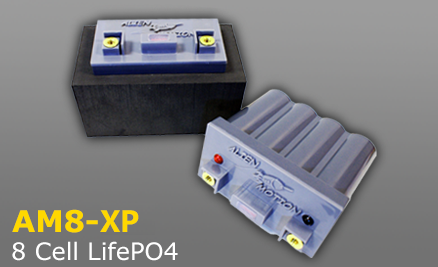
AM8-XP 8 Cell LiFePO4 Battery
AM8-01

MSRP $134.99 *SALE* $119.99

FREE DOMESTIC SHIPPING (Email for Intl Rates)
Select Polarity:
 
MODELAM8-XP
Length60mm - 2.36in
Width114mm - 4.5in
Height100mm - 4in
Weight820g - 1Lb 13oz
Capacity5 Amp Hours
Amperage Output<3 pulse="" sec=""> - 375 Amps
Max Charge Voltage & Current14.4V / 10 Amp Hours
ConnectionBrass Terminals with 6mm x 10mm Threaded
EnclosureImpact Resistant ABS Plastic Case
MountingAM Pod™ Enlarges Battery to 150mm L x 85mm D x 100mm H
PolarityPositive Left or Right

Product Details

The Alien Motion AM8-XP is a favorite among our customers. We found a sweet spot between size, weight, cost, and starting power. Well suited for engines up to 1200cc 4 cylinder, 1000cc twins and personal watercraft, the AM8-XP is a serious workhorse. Its 60mm depth allows it to fit in spaces too small for most lead acid batteries, while weighing under 2 lbs. Guaranteed to provide better performance and provide several times the lifetime of the original battery with proper use and maintenance.
Our all new XP series offers greater starting power and capacity with no more weight!.
Great battery for applications that require less weight and have limited space.
  • Ultra-Lightweight and High Power Lithium Motorsport Battery
  • Holds a charge with minimal drain for years when there is no draw on power
  • 2-Year Warranty and Out of This World Support
  • Great for everyday use for bikes up to 1200cc 4 cylinder, 1000cc twins and personal watercraft
  • Works with the original charging system
  • Great for racing applications
  • Significant cost savings and longevity compared to lead acid
V-Twin engines over 1000cc and cold weather usage should utilize the Alien Motion AM12-XP. for ultimate cranking power.

Saturday, August 13, 2016

REMOVING MORE COMPONENTS

This morning  work continued on removing components in the Fiero. The DC-DC converter, shunt and insulators for the shunt were removed, followed by the contactor that was used to shut off power to the charger. The only thing left before dropping the motor cradle is to jack up the car and get a couple of bolts removed that tie the battery end plate to the angle iron battery racks. Then I will be able to remove the battery module. I want to assemble the module out in the driveway and do a discharge down to 90 volts and then charge back up to 136 volts. I will probably do this a couple of times out in the driveway to make sure the module is not damaged so that if it does fail, it will be away from the garage.

I have not decided what motor/controller arrangement I want to go with but will either need to keep the voltage at 120 Volts or 360 volts. Not sure if the HPEVS motors go up to 360 volts so may have to stick with the 120 volt or consider another motor/controller arrangement.

The lessons learned from the controller fire are:


  1. Never assume that because the accelerator is not being depressed that the controller cannot send power to the motor. I had started to exit the car to check the status of the LED lights on the controller and had left power on to the controller. Fortunately the parking brake was on and the car was in 4th gear, so had enough time to jump back into the car and keep it from going into the field on the other side of the road.
  2. There needs to be an emergency cutoff switch inside the car and you need to practice using it so anytime there is a problem, it is a natural maneuver to  use it. After turning the car to avoid the field, after pulling on the emergency and standing on the brakes with no slowing effect, turned the ignition completely off. This did cut power to the controller but also because in the excitement turned the ignition on to the lock position, locked the steering and shut off the vacuum pump for the brakes. Fortunately the wheel was turned enough to miss the car stopped at the stop sign but only luck kept me from rear ending him.
  3. You should carry at a minimum a Class C fire extinguisher in the car for electrical fires. Had I had one the Fire Department and Sheriff would not have had to been called. If the batteries catch fire, you are probably not going to be able to have a fire extinguisher big enough to do anything anyway.
  4. There should be an emblem or decal on the outside identifying the car as electric. I was not injured in the event, so was able to tell the fire department that the car was electric. One of their questions after the fire was extinguished was how could we tell the car is electric if you were unconscious when we arrived at the scene?
I am sure the Warp 9 is going to take a major overhaul, with at least a communicator machining, new brush holders and brushes for it to be used again. Also, before installing a new motor, the transaxle is going to have to be gone over, as it does not shift correctly. Also one of the seals in the axle is leaking and has play when shaken, so believe the bearing is going bad. Additionally, new shift cables need to be installed as the fire melted the ends and the fire extinguisher residue caused corrosion on the metal rods that go inside the sheathing. 

May be awhile before this puppy hit the road again, so canceled the insurance for now. 

Sunday, July 31, 2016

UNCOVERING THE CARNAGE

After the wrecker dropped off the car I turned the ignition switch to the run position and remarkably, the JLD404 was reading 128 volts on the battery modules. This was a relief, as I was really worried about the module getting damaged.


AFTERMATH OF FIRE


BURNT UP CONTROLLER


FIRE EXTINGUISHER RESIDUE

On Monday, the front battery module was disconnected from the cables going to the rear module. The rear module was then disconnected and since the fire had left blackening on the aluminum battery cell housings, I was a little worried about voltage tracking to ground, so took some of the connectors off of the module so the voltage would be lower if it was tracking. By Wednesday, the controller was removed and much of the burnt wire and loom was cut and removed. The engine compartment was a sooty mess, so I mixed up some detergent with water in a spray bottle and tried to remove it from the engine compartment. Then on Saturday, the charger, charger bracket, and motor base were removed from the car. I was still getting quite dirty from soot so went to AutoZone and purchased some engine de-greaser and Brake cleaner. The engine compartment was soaked with the de-greaser and the top of the battery module was sprayed down with the brake cleaner, scrubbed down with a brush, and wiped down with a rag to try to remove as much soot as possible. The soot on the aluminum sides was also cleaned and scrubbed with a brush and wiped down. Then the sides of the engine compartment was hosed down to wash off the de-greaser. It is much better but I still get a little soon on me when working. The contactor and emergency shut off switch was then removed along with the base it was mounted on.

On Sunday the motor brush cage was removed and there was quite a mess from the fire extinguisher that looked like it was corroding the communicator and brush wires. The communicator was sprayed down with brake cleaner and wiped out as much as possible. Then the top brush and connection post was removed from the motor. Not sure I can get to the remainder of the brushes but am hoping they can be removed without having to pull the motor. Even if they can be removed, I doubt the communicator will be able to be cleaned without removing the motor and the only way to remove the motor is to drop the entire cradle, so am going to need to remove the battery module. Basically, I am back to square one on the build and If the cradle is dropped and motor removed, will need to seriously consider going with an AC motor set up. Also if the motor cradle is dropped, I will probably purchase a new transaxle, as the one currently in the car has never shifted correctly.

I have been thinking about the lessons learned from the fire experience and will try to write about that in the next post.

CALM BEFORE THE STORM (cont or) NOTHING HURT WORSE THAN MY PRIDE!

... the LED communication light was still green and blinking normally on the controller. I got back in the car and turned the key off, waited for a moment and switched it back to start to put 12 volts back to the controller. Upon pressing on the accelerator, still no power to the motor, so went back to the back of the car, and now the LED was flashing yellow, indicating a problem with the controller. Then I got back into the car and cycled the ignition again, hoping the error would clear and the controller would start working so I could continue to the store. Still nothing, so I called my wife and asked her to look online and try to find me a tow home. While waiting for her to call me back, I cycled the ignition again and still nothing, so started to exit the car to see if the LED was still indicating a fault when the car started moving. Fortunately the parking brake was set so I quickly jumped in the car and pulled on the emergency brake, as I thought the car was coasting. Quickly I realized that something had happened inside the controller, as black smoke started poring out of the back, so hit the brake. The controller must have been delivering full power to the motor as the brakes did little and quickly turned the steering wheel to keep the car from going out into a field on the other side of the road. I got the car turned into the lane but was headed toward a car that had stopped at the stop sign at the end of the road where it intersected State Route 310 so turned the wheel to avoid hitting it. Then I switched the ignition off but in all of the excitement, actually locked the steering wheel. Fortunately, the wheel was locked with the wheels turning left enough that I missed the car at the stop sign but was quickly approaching the State Route from the wrong lane of the street I was on. With the ignition off, I also lost the power brake vacuum pump. The ignition switch was switched back to the run position and I quickly scanned for cars coming so I could try to make a quick turn if necessary to avoid them but no cars were approaching, so got the car onto the berm of the State Route and the car to a stop. By now, smoke was poring out of the engine compartment, front battery compartment, and the inside of the car. A car had stopped and called 911, so I opened the hoods on the motor and front battery compartment. There were flames poring out of the controller and periodically arcing as the insulation was melted on wires and they shorted together. Also, there were capacitors popping and at this point the scene was just chaos! My wife called back just as I was getting the tool box and charging cables out of the trunk of the car and as she was talking to me, the bystanders who had called 911 were screaming, get back, get back! My wife was freaking out on the phone as I am sure I was also. After ending the call, I got into the cab of the car to retrieve the tablet, as at this point, thought the whole car was going up in smoke. After what seemed to be an hour (more like 5 or 10 minutes) the Pataskala Fire Department arrived and I preceded to tell them the car was electric. They put the fire out with a type C electrical fire extinguisher but I was also concerned about the batteries catching on fire. Since it was an electric car, they would not cool the base of the batteries down with water but did get out their temperature camera and determined that the internals of the controller were 300 deg and the outside of the batteries were at 200 deg. They did get the hose out and sprayed water under the car to put out the grass that was burning and kept monitoring the battery module. After the temperature came down to around 100 deg on the batteries, they offered to take me to a carryout up the street, so I could cool down in the air conditioning while waiting for the Sheriff to arrive.

The Pataskala Fire Department was great but it was obvious they had never received any training on Lithium batteries and they were totally opposed to using any water. We discussed how they could tell that a car is electric and I explained that the power cables are normally orange on an electric car. It became obvious after talking to them for awhile that there probably should be an emblem or sticker on the outside of the car that identifies it as electric, as in the case of the Fiero, it just looks like an ICE car on the outside. The fire fighters gave me a cold bottle of water, helped me load up all my tools and cables, and gave me a ride to the carryout to wait for the Sheriff.

By the time the fire truck dropped me off at the carryout, the Sheriff pulled up. I had been standing out in 90 deg heat for over an hour and was drenched with sweat. The deputy let me go inside the carryout to use the restroom and cool off a little then we discussed the fire. This was his first car fire, so had to talk to his Sargent back at the station to find out how to proceed. We then drove back to the car to get the registration and insurance card and then he gave me a lift back to my house. My experience with the fire and law enforcement folks was great and left with a much better appreciation what they do for the community. Both were very interested in the EV conversion and I had a very great opportunity to discuss some of the recent unrest in our country over law enforcement and their perception by the Citizen in their communities.

After the deputy dropped me off at my house, my insurance company was called, as I have towing coverage. My wife had called all of the local towing companies and none of them could tow my car or hours. The Safeco Insurance road side assistance representative took all of my information and told me they would leave a voice message of when to expect the tow truck to show up and would have the tow company give me a call when they were close to where my car was parked. I drove back to the Fiero and surprisingly, the 12 volt system still bad battery power and I was able to put the windows up and also closed the front hood and rear engine compartment hood. Then I headed to Krogers to pick up the items my wife needed when I originally took off in the Fiero. As soon as I had all of the bags carried into the house, we received a call that the tow truck was almost ready to pick up the Fiero and when I arrived back to where it was parked, the driver was actually hooking it up. We drove back to the house and he dropped the car in the back corner of my driveway. Finally the end to a rather long afternoon and evening that by now,  kind of seemed like a dream.


More to come!


Saturday, July 30, 2016

CALM BEFORE THE STORM

Last weekend the Fiero interior was finally finished and on Friday, took it down to the Marathon to pick up a 6 pack of Buckeye Lake Shovel Head to celebrate. The Fiero was then driven home on Rt 70 and accelerated smoothly to 70 mph. The pack voltage meter was now reading amps correctly and was actually able to do some comparisons of the amount of amps needed to cruse at 60, 65, and 70 mph. Surprisingly, there was only a slight difference from 60 to 65 mph but jumped considerably to cruse at 70.

Upon returning home and popping the top on a nice cold Shovel Head, noticed that the temperature in the house was up around 75 deg with the thermostat set on 72 deg, so went down to the basement to check the duct filter. The filter was a little dirty, so pulled it out and cleaned it. The temperature in the house came down over night to 72, but while looking around the air handler in the basement, did notice that the large tube going into the evaporator was not quite as cold as normal and the small line seemed warmer than usual. By Saturday afternoon the temperature was in the high 80s approaching 90 deg outside and the house temperature started coming up again. The filter had just been cleaned, so went outside to look at the compressor unit. Sure enough, the condenser fan was not running, so removed the cover on the top of the unit and was able to put a small window fan on top of it. The temperature in the house came down a degree but did not come back to 72 deg until Sunday morning. Figuring the chance of finding a new fan motor on Sunday was slim and none, fired up the internet to look for an industrial fan to put on top of the unit. After a short search, one was found at a reasonable price at Lowes, and they were showing two in stock at their store in Reynoldsburg, OH, so jumped into my truck and headed to the store to pick one up. Upon returning home, the 24 inch round industrial fan was put on top of the condenser on the compressor unit and believe it or not, the temperature in the house dropped back down to 72 deg. It was 90 deg outside so this was really good news!

My wife asked me to pick up a few items for her at Kroger in Pataskala, OH and had been charging the Fiero during the day, actually leaving the windows down so the interior would be cool if I decided to take it for a ride.I decided to stop by a car wash in Etna, OH, as the car had been sitting all spring was was quite dusty. I almost did not go through the car wash as I was a little worried about getting water in the controller since I had removed the old rubber splash guards and had not installed the new ones yet. I decided to go for it and purchased the least expensive wash, as those usually do not spray water underneath the car as it is entering. The HURRICANE car wash must want you to be really satisfied because as soon as I pulled in the jets started spraying underneath the car. I speed up a little to try and get as little water up in the engine compartment as possible. After the wash had completed, the car pulled out of the car wash, through the dryer and out toward the street just fine. As I turned onto the street the car came to a halt, right in the left hand lane. I got out of the car and lifted the motor compartment hood and ............

TO BE CONTINUED!


Saturday, July 16, 2016

BURNT FINGERS, BURNT SEAT, BROKEN HEART!

Last week in the evenings, work started on making a new vinyl strip to cover the hole in the center console. The first one that was made looked great at first but over the course of the year, detached from the console. This time 3M headliner adhesive was used and seemed to attach the strip to the console much better. Also, the sides of the console pad had started to detach from the plastic frame, so the same 3M adhesive was used to reattach them. Then the console was given another coat of charcoal gray interior paint.

Then this week the wiring on the panel meters in the dash was checked. After some tracing out, I was able to get the pack ammeter to read amps and the 12 volt meter to read out voltage. The instrument cluster was bolted up and the steering column was bolted back in. The only problem was that while working on the pack voltage wiring, the positive and negative wires were inadvertently touched together burning my fingers and shooting a stream of molten copper onto the driver seat. I had been very careful not to let anyone smoke in the car to try to prevent burn holes in the seats but now there is a nice little charred spot on the driver seat. I guess it is the excuse I needed to go ahead and buy leather seat covers.

Then work turned to the heater console cover. A new mount for the Dell tablet was made out of steel sheet metal to try and make it more solid and after it was finished, started working on getting the vinyl cover attached to the plastic sides of the console.

It seems like it is always one step forward and two steps back but I really am getting closer to starting work on installing the last battery module. With any luck, I will be able to take it to Drive Electric Day at Easton Town Center in September, this year.


Saturday, June 25, 2016

ANOTHER PROJECT CLOSER TO WORKING ON THE FIERO

The rear platform flap that had the bent hinge finally arrived from Germany and just like the picture on EBAY, included the flap, hinge and little strip, not just the flap that the part number indicated. After installing it, the top went up and down, with no oil leakage on the cylinders and while waiting for all of the parts to arrive, actually was able to get a wax job on the whole car. So the Mercedes SLK230 is back on the road and the garage is ready for the next project!


SLK230

Next up is to paint the top and hood on the Chevy Cavalier, so it can be sold. Just too many cars and trucks sitting around so after the paint touch up, hopefully there will be one less. The garage was hosed down to get rid of as much dust and cobwebs as possible and a filter was put in one window and a fan in the other. With a HVLP spray gun and the fan, there really isn't that much over spray when painting. Plastic sheet will still be hung to make sure no over spray gets on the tool box and items on the shelves.


EXHAUST FAN


OUTSIDE AIR FILTER


With any luck, I should be back on the Fiero by the middle of July.

Until next time,

Randy

Sunday, June 12, 2016

NO PROGRESS ON THE FIERO

The plan was to repair the top hydraulic cylinder on the SLK230, paint the hood and top on the Cavalier, then to put the third in the Fiero but as Murphy says "Anything that can go wrong, will go wrong!" and this is the case with the Mercedes top cylinder.

I was actually able to rebuild the cylinder in place, without having to remove it from the car but in doing so, had to destroy the retainer clip holding the rod seal and bearing in place. I thought finding a new retaining clip would be easy but that has not proved to be the case. I found two companies who make the standard listed retaining clip, but both of them required that I purchase 100 of them at $3.50 each, so tried to use a standard snap ring. Being the groove for the wire retaining clip is 20 mm and a snap ring is just square, the retaining clip pushed out when operating the top. Now the top of the SLK230 was stuck in the down position and I could not get to the release cord on the passenger side of the car. After grinding the pin on the mounting point of the cylinder, I was able to rebuild the cylinder again, this time making a retaining ring out of a key chain ring. The top is finally closed but it still blew the seal out again, so I ordered another cylinder from EBAY to get a new clip. $100 for the whole cylinder was still cheaper than the $350 for 100 wire retaining rings at $3.50 each.

There is a car show in Lancaster, OH  on Saturday, which is close enough I could drive the car there and back so I may try to get the interior back together enough to take it but am not sure I can get everything back together by then. Anyway, as soon as the Mercedes top cylinders are back together and the Cavalier top and hood are repainted, I will get back on putting the third module back in the Fiero.

Until then,

Randy

Monday, May 30, 2016

RECORD HITS THIS MONTH


Each year the hits or the Fiero Rebuild site start to peak in late spring and this year the May hits reached 672, a new monthly record. A little strange, as I really have not worked on the car this month.


RECORD MONTHLY WEBSITE HITS

I am currently doing a little paint work on my Cavalier, getting it ready to sell. The body work is done so now the garage needs to be cleaned to lay down a little paint. The plan is to paint the Cavalier, repair the top hydraulic cylinders on the Mercerizes SLK 230 ( just recently repainted) and then pull the Fiero in to install the third battery module. Hopefully by the middle of June, I will have some Fiero rebuild posts to share.

Thanks for viewing and make sure and leave comments, as they help keep me motivated.

Randy 

Wednesday, May 11, 2016

THIRD MODULE TOP CHARGE

Over the last couple months the Better Place battery module has been drained down to as low as 2.5 volts on the lowest cell and allowed to drift back up to the settle voltage. After the last drain got all of the cells below 2.85 volts, all of the individual half cells were drained down to 2.84 volts. Of course, they wanted to drift back up but after going through all of them 3 times, decided to go ahead and charge the module up to 130 volts to match the other two installed modules.

A new male plug was purchased to put on the Zivan NG3 charger that originally came with the car but after hooking everything up, just had the red light flashing, that says it is not seeing voltage. Voltage was checked where the wires are soldered to the board and pack voltage was present there, so something must have either come unconnected or blown.


ZIVAN NG3

Not to be discouraged, this evening when I got home from work, the module was rolled outside and hooked to the TCCH charger in the Fiero. The charger was started and the voltage started climbing. 


MODULE CHARGING

While the module was charging, some time was taken to survey possible placement in the front of the Fiero. 


SPACE FOR MODULE IN FIERO

Progress has been slow with all the plumbing work and home improvement projects going on this spring but hopefully a little time will come free to continue on the fiero and get it back on the road for summer.

Until next post,

Randy

Monday, May 2, 2016

STARTING THE FINAL BOTTOM BALANCE ON THE BETTER PLACE BATTERY MODULE

Neither of my garden tractors were mowing properly, so I decided to sell both of them and and buy a new one. After listing them on Craigslist, I received an email from a guy who wanted to come and pick it up the Yard Machine on Saturday. Sure enough, he showed up with a trailer and after the usual dickering on price a little, handed over the payment, loaded the 10 year old Yard Machine and drove off a happy camper! Ok, one down and one to go. The other garden tractor is a 1970 John Deere 110 that I restored. It has a new paint job and the motor was completely overhauled. The tractor has a 48 inch blade and is just a little too big for my 1/2 acre yard, as it will not make as sharp of turns as a newer tractor but would be great with someone with a couple acres. The tractor had been sitting all winter and was a little dusty, so I decided to spend Sunday cleaning it up and getting better pictures for the listing but this could be done while starting the final bottom balance on the Better Place module, so felt a little multitasking was inline. While I was washing and waxing the tractor the EPM-5740TVR with a flashlight bulb attached to the aux. contact was draining the voltage to 2.75 volts on all of the 1/2 cells. 


1970 JD 110


EPM-5740TVR

The highest 1/2 cell was 2.98 volts so none of them had gone back up to 3 volts like they usually do, so felt that draining them all down to 2.85 volts would be a good plan. When the leads are first hooked up the light bulb turns on and off kind of like a blinker light on a car but finally settles down and only comes on every 5 or 10 minutes until finally it just stays off. So far, I have balance 5 full cells and when going back to check the ones I started with, was relieved to learn that they were still holding at 2.85. I always take a temperature reading because I believe the voltage tends to come up as the temperature rises. Not sure if this is actually happening but from past experience, have found this to be the case.


This process will be repeated until all of the cells stabilize, then the module will be charged to full voltage and then drained down to match the cell already in the Fiero, so it can be added to the pack.

Sunday, April 24, 2016

OTHER PROJECTS

Almost all of my spare time the second spring and summer after the Fiero was purchased, was devoted to the re-build, so many projects around the house went undone. I have been fortunate the last two years to have received rather generous bonuses from my employer, so last year and this year have been focusing on getting some things done around the house, that have been put off for way too long.

Last year, the kitchen was redone with a fresh paint job for the floors and ceilings, new counter tops, and a new grout job for the existing tile. New basement windows were installed as the old ones were just single pane and you could feel the cold air coming in in the winter. Also, the bathroom was redone with a new coat of paint on the walls and ceilings, new counter tops, a new bathtub skirt for the whirlpool tub, new exhaust fan, new lights above the vanity sink, new mirror and a new grout job on all of the tiles. All of this work was not completed until November because of the workload of the contractors who did some of the work.

This year I decided to get ahead of the game, so started lining up what was going to be done in January so contractors could be scheduled or materials procured much earlier in the year. By the time my bonus was deposited in my checking account this year, a plumbing contractor had already given me an estimate for the plumbing work  that needed done and after deciding that a contractor would be just wasting a bunch of money, had most of the new appliances ordered. I live in the country and have well water that is very hard and leaves a rust stain on all of the sinks, bathtubs, and toilets, so got an estimate to have the existing Kinetico water softener rebuilt but after finding out they wanted $1600, decided to purchase a Water Boss iron filter and water softener from Home Depot. Shipping was free and the units were dropped off on a skid in my driveway. 


WATER BOSS IRON FILTER AND WATER SOFTENER

Every month my electric utility company (Also my employer) kindly reminds me that my electric usage is quite a bit higher than all of my neighbors, so decided to look for a more efficient water heater and refrigerator. After looking around, I found a GE 4500 watt top and 4000 bottom element, heat pump water heater from a company online for $950 delivered. This was rather good, as my local utility company was offering a $500 rebate on this unit. Not bad, a heat pump water heater for $400, that can be used as a regular electric element water heater just by pushing a button. Again, the unit was delivered to my driveway and the driver actually wheeled it into my garage for me.


GE HEAT PUMP WATER HEATER

A new energy star refrigerator was purchased from Home Depot and again delivery was free and included set-up. The guys brought it into the house, and after getting in plugged in and running, explained some of the basic things I needed to know about it. Again, my utility company will give me a $50 rebate off the purchase price of the unit. 


FRIGIDAIRE ENERGY STAR REFRIGERATOR

Needless to say, I have pretty much been busy every weekend since the middle of March installing all of the new units and plumbing them up, so work on the Fiero project has been nonexistent. Every thing is installed and working great except the new water tank and that should be able to be done in one day, then I can jump back on the Fiero.

I did check the batteries and even though I took the lowest cell all the way down to 2.5 volts and let it come back up with a 7 watt night light, once turned off, the cell drifted back up to 2.85 volts. I will need to find out what the highest cell settled at and then will charge all of the cells to that level. Then I will charge the module and discharge it to see how close the cells are after a cycle. 

Hopefully some Fiero project progress updates next month!


Sunday, March 20, 2016

After discharging the lowest cell down to 2.7, the module was rested for 2 weeks and today all of the cell voltages were read again. All of the voltages had drifted back up to around 3 volts with the highest being 3.096 and the lowest, 2.068 volts. The lowest half cell shifted from #5 to #9. The two flood lights were hooked up and the lowest half cell was taken down to 2.5 volts. Then the 40 watt bulb was connected and the voltage started increasing again. Once the voltage stabilizes, the 4 watt night light will be connected and the voltage drained until the lowest half cell is down to 2.5 again. Hopefully after a couple weeks rest, all of the half cells will be below 3 volts and I can start charging all of them up to 3 volts. This is kind of like top balancing the bottom and seems to work best to get them to all level out at the same voltage. Jack Rickard at EVTV reported that he was using 3 volts as his bottom balance voltage but this is before his module caught on fire, so I may check with him to find out what voltage he is using now.

Until next time,

Randy

Saturday, March 12, 2016

BATTERIES, BATTERIES, ADD MORE BATERIES!

The last Better Place battery module is currently being bottom balanced so it can be synchronized into the Fiero's battery pack and I thought it would be good to show you where I gained my knowledge on bottom balancing lithium batteries.

Below is the presentation on lithium batteries from EVCCON 2014:


Monday, March 7, 2016

HOME IMPROVEMENT

The Fiero project has been on hold as I am trying to do a little home improvement. Every couple months, I receive a notice from my electric supplier, America Electric Power reminding me that my energy consumption is higher than average for my size home, so decided to upgrade our water heater to one of the new heat pump energy efficient models. I found a great deal online from Goedekers, an online appliance retail company that offered a GE GEH50DFEJSR GeoSpring Hybrid Electric Water Heater for around $500 less than available at Lowes or Home Depot. In addition, since the water heater is listed as Energy Star compliant, American Electric Power is offering me an additional $500 rebate on the unit.


GE GEH50DFEJSR

The unit is also listed as saving the average households $376 every year in water heating expenses and in my case, believe the savings could be much greater.

The weather in Central Ohio is supposed to be in the 70s all week, so hopefully a little more progress on the battery module bottom balancing this week.

Thanks for stopping by,

Randy

Sunday, February 28, 2016

THIRD TIMES A CHARM???

This is the third Better Place Module that I have had the privilege to bottom balance and must admit, after seeing the aftermath of the fire at EVTV, am being a bit more cautious. When bottom balancing the Better Place Modules, they are always on  a furniture dolly, so they can be quickly wheeled out into the driveway should anything go wrong.

As I described in my last post, the process is started by finding the lowest cell and then hooking up two 1000 watt halogen flood lights and bringing them down until the lowest cell is 2.9 volts. The lights are then disconnected and another voltage reading pass is taken to make sure that is still the lowest cell. The volt meter is then moved to the new lowest cell or left as is, if that is still the lowest cell. Then a 40 watt light bulb is used to draw the cell voltage down to 2.75 volts. Once the cell is down to 2.75 the light bulb is turned off and another voltage pass is taken to make sure that is still the lowest cell. Then a 5 watt light bulb is connected to the module and left on until the lowest cell comes back down to 2.75. This is the stage I am currently in, as once the 5 watt bulb is connected, the voltage starts coming  back up and often goes close  to 3 volts before it starts coming down again. I started this yesterday morning and after 25 hours of discharging, still do not have the low cell stabilized to 2.75 volts.

When the cells are drained, they seem to always drift back up but when they are charged seem to always drift back down in voltage, so once I get the low cell down stabilized at  2.75 volts, I start charging them all back up to 2.8 volts or what ever voltage the highest half cell is resting at. Remember, the Better Place cells are LiMn2O4,  not LiFePo4 cells and operate at a higher voltage range, so when they are down to 3 volts per half cell, are pretty much depleted. My controller is set to cut off at 90 volts or around 2.8 volts per cell, so the module should never discharge lower that that.

While the module is being discharged, a post it note is stuck to my laptop to remind me and I check the module every half hour or so. I have found that since the LiMn2O4 cells are so "bouncy," the best way to get them to stabilize below 3 volts is to discharge at a very low level when approaching the desired low voltage.

Also, measurements were taken in the nose of the Fiero and the module will fit, so am thinking about how to mount it. To get the module in from the top, the hood will need to be removed but this may be the best way to install it.

Until next post,

Randy

Saturday, February 27, 2016

BOTTOM BALANCING THE LAST BETTER PLACE MODULE

We have had a few nice weekends in the last half of February, so decided to start bottom balancing the third Better Place battery module. 

The terminals and connectors were  all cleaned with scotch bright and a thin coat of Noalox anti-oxidant compound was applied to the them. The connectors were positioned on the terminals and a small drop of Loctite was applied to each of them before threading them into the terminal. A socket on a Dewalt drill with the torque setting on 3 was used to tighten all of the terminals.  

Then voltages were taken on each half cell and most of them were in the 3.85 volt range but one cell was only 3.65, so the volt meter was hooked on that half cell to monitor the drain down of the module.

Eye terminal connectors had been previously crimped onto the end of an extension cord and two 1000 watt flood lights are used to draw down the module. When the voltage reading on the lowest cell approached 3 volts, the individual half cell readings will be taken again and a different cell will be monitored if necessary. I will drain the module down to 88 volts or 2.75 volts/half cell and let the module set for awhile, as it will drift back up in voltage in a few hours. Then a 100 watt light bulb is hooked up to allow the voltage to be drawn down slowly. Finally a 5 watt night light is hooked up that allows the voltage to be drawn down even more slowly. This is the only way I have found that will cause the voltage to finally stabilize and not keep drifting back up. Even after that, over a couple of weeks, the cells will drift back up to around 3 volts. 

After the initial draw down and couple of weeks sitting, individual half cell balancing is done with a JLD404 and a 4 volt flashlight bulb. The JLD404 is set so it drains the half cell down to 2.75 volts and does not turn back on until the cell drifts back up to 2.95 or so. These are just hooked up and allowed to cycle until the half cell stabilizes under  2.95 volts.


BOTTOM BALANCING MODULE


With spring just around the corner, I want to get a running start to get the Fiero back on the road with all three modules installed.

Thanks for visiting,

Randy

Sunday, February 21, 2016

TOPPING OF THE PACK

While lithium batteries really don't self discharge much, the pack had not been charged since last year and the Fiero had been driven down the road and moved around the driveway a couple times, so with the temperature close to 70 on Saturday, I decided to hook up the JLD404 and top off the pack. The first thing I noticed is the JLD404 in the car was reading higher than the EPM-5740TV volt meter in the engine compartment, so I will have to get out a voltmeter and calibrate them. The module catching on fire at EVTV has heightened my awareness to the possibility of the modules lighting up, so want to make sure I have a good back-up system to discontinue the charge.

The amp meter on the dual volt/amp meter reads when the motor is revved up but is very erratic and seems to be out of sync with the amp reading on the JLD404. The wires are twisted coming from the shunt but it acts like it is getting interference form somewhere.

Not much work was actually done but it was good getting out and messing with the car.

Until next time,

Randy

Sunday, February 14, 2016

PARTING WITH MY MIATA

A hundred thousand miles ago, I purchased a 1989 Miata with 75,000 miles on it from EBAY. After a flight to Philadelphia, and a puddle jumper to Allentown, PA, I was on my way back to Ohio. After driving a few miles I noticed a strong smell in the car and as the previous owner had recently passed, wondered if it wasn't in the car. Half way home the clutch quit working but was able to put in some more fluid and make it home.

Turned out the fender drains were plugged and water from the convertible top drains into the fender wells then exits through the drains. The slave cylinder on the clutch had to be replaced but after that, the car was great. You normally drive down a road in the summer with the air on but in the convertible, you could smell freshly cut grass and the sweet smell of wild flowers.

When EVTV had their Build Contest before the first EVCCON, my entry was the Miata, using rear drive, single speed transaxle, AC motor. I didn't win but did drive the Miata to Cape Girardeau for the first four years. The car was just sitting in the driveway and had an overheating problem that I just couldn't seem to isolate. Then the window regulator broke and the drivers side window would not go down. Instead of letting it sit in the driveway and pay insurance on it, just seemed that selling it was the right thing to do, so it was listed on Craigslist.

I received several inquiries but finally got one from a guy in my area who wanted to come and look at it on the weekend. We have been experiencing some of the coldest weather the last several days, so when I went out Saturday morning to get the car running, I had problems getting the trunk open to try and charge the battery. Ok, finally got it open and hooked up the charger, so several hours later, had the same problem getting the door open to try and start the car. Finally when in the car, nothing! The battery was removed and taken back to Autozone where I had purchased it and after fumbling around with it for a few minutes, the salesman said "Yep, she's toast!" Fortunately, it was still under warranty, so walked out with a brand new battery. Once the battery was in the car turned over smoothly and started, for about two seconds, then just puttered. Ok, it was cold out and car had not been started in months, so decided to put a heat gun under the hood to try and warm the engine up a little. No surprise, the hood would not open, so after cleaning as much snow and ice off of the hood as was possible, was finally able to pry it open and get the heat gun under the hood. After going inside to get warm for about a half hour, I tried to start the car again. This time it started for about 30 seconds, then puttered out. After a couple of tries, the engine finally kept running and after idling about 15 minutes, took it down the road for my last drive. Upon returning, I pulled it in the garage and by the time the potential buyer got here, had most of the snow and ice off of the car.

After the usually tire kicking and dickering back and fourth on a price, we came to agreement and the Miata was gone.


1989 MIATA

So long to the Silver Bullet!

Randy