Thursday, December 31, 2015

2015 BUILD REVIEW (SECOND HALF OF THE YEAR)

By the middle of August, the battery modules had been matched and connected together in parallel. In addition, a TCCH PFC-3000 charger was installed and the car was driven fellow EV builder, Brian Couchene's house, the longest distance the car had been driven to date. Brian's  father was visiting, so we took a ride up and down the hilly roads nearby . The Fiero was actually able to climb the steep grades in fourth gear, which was very impressive.


08/02/15

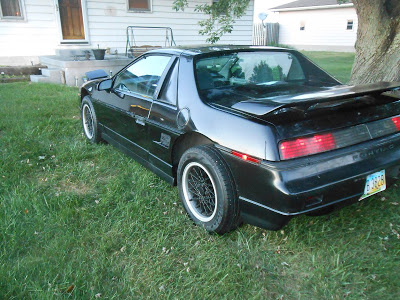
By the beginning of September the Fiero was pretty much ready to take to EVCCON, the plastic side trim and lower bumpers were sanded and painted satin black, and the car was professionally detailed.


SEPTEMBER 9, 2015

Shifting was still erratic, so a set of new bushings were ordered for the shift lever from Rodney Dickman. The instructions clearly stated to be careful not to break the aluminum shift bracket but the pin would not budge and finally when I thought it did, found that the shift bracket had snapped. This was not good, with only a few weeks until EVCCON the transaxle could not be shifted. I got on Thumb Tack, found a couple of welders in my area and finally talked one of them into welding the shift bracket on short notice. The job was a very professional and sturdy fix, so i was able to get the shift linkage hooked back up. The new bushings took the play out of the shift bracket but shifting was still erratic and seemed to come out of adjustment after a few shifts. 


SEPTEMBER 16, 2015

The last improvement made before EVCCON was a new vacuum pump. The one that came with the car was very noisy but I found a smaller one that is rather quite and operates the power breaks just fine.


SEPTEMBER 21, 2015

A week before EVCCON, Jack Rickard announced it was canceled this year because he could not secure insurance for the venue. Shortly after the announcement, it was announced that there would still be an open house at the EVTV Garage for anyone interested in still making the journey. Tuesday morning, September 29, 2015, Brian Couchene arrived at my house with his tow dolly, the Fiero was loaded, and we were off to EVCCON!


SEPTEMBER 30, 2015

Upon returning home from EVCCON, I went to work on all of the problems that turned up from driving the Fiero around Cape Girardeau for a week. The right side instrument lights were not lighting up and the 12 volt digital meter in the instrument panel quit working so a new instrument cluster was purchased, along with a new ignition switch.


OCTOBER 7, 2015


By the end of November, the instrument cluster was finally rewired using a D-Sub connector for the digital volt/amp meter wiring, and was ready to be installed in the Fiero. The steering column had been dropped and the new ignition  switch was installed.


NOVEMBER 29, 2015

By the beginning of December, the instrument panel was back in the car with the lights and meters working.


DECEMBER 13, 2015

So this is pretty much the year in review, pretty much right back where I started. With the weather finally turning cold, there will probably not be much more progress until spring. The guys at work are wanting to see the car but I do not want to chance driving it into Columbus, OH until the third module is installed, just in case I am not able to charge at work. While the interior is torn apart again, I will remove the passenger seat to paint the frame work and to pull off the interior panel so the light switch on the door can be replaced.

Thanks for visiting my blog this year!

Randy

2015 BUILD REVIEW (FIRST HALF OF THE YEAR)

It is ironic that 2015 started with wiring the console and actually ended with that also. After you start driving the conversion, you always find things that you are not satisfied with and end up having to go back and rework them. I guess this goes back to your original engineering and planning, so this will go down as a  lesson learned for future builds.


JANUARY 3, 2015

By the end of March, the interior was finally back together and actually turned out pretty good. The heater controls were wired to be able to turn the heat on and off with the temperature slider, the Venue 8 Pro tablet was mounted to be able to view the Synkromotive Motor Controller user interface, and all of the meters were reading properly.


MARCH 29, 2015

By early May, I had installed LED dome, instrument and headlight lamps to help cut the power required to drive at night and I must say, was rather impressed with the LED headlamps.


MAY 9, 2015

By the middle of May, the Fiero could be driven and with one of the Better Place modules, had around a 25 mile range using 251 watt hours/mile.


MAY 12, 2015

As a precaution, a JLD 5740 meter and ABB contactor were installed to be able to disconnect the 240 volt AC power to the charger when the charge reached a predetermined level. This was just to give me a little piece of mind that if the charger control did not turn off or tried to float charge, the ac power would be cut off to it.


MAY 31, 2015

Side panels and a floor were fabricated to enclose the front trunk compartment and the second module was modified and mounted in the front of the car before conduit was mounted under the car to protect the power cables. The second module was finally installed, effectively giving me a 50 mile range.


JULY 31, 2015


Sunday, December 13, 2015

VOLTAGE BUT NO CURRENT

Sunday after a little wire swapping, the pack voltage started reading on the meter, but not the voltage. Not sure what is happening here but on the old meter set-up both the voltage and current were reading on the pack. The problem was the dc-dc converter wire had come off on the 12 volt meter and it no longer was powering up. Now I can get a voltage reading on the 12 volt meter but the current still reads zero. When these meters were out of the car, I should have hooked them up on the test bench and made sure I knew what each wire was. I would recommend if you purchase any of these, you stick with the same model if you are using more than one and test them on the bench before installing as the documentation sucks!


METERS READING VOLTAGE

Ok, if the meters aren't enough of a problem, as I stated last week, the dome light dims but stays on when the doors are closed. After reading several blogs, I checked all of the door switches but when operating the passenger side switch, while letting it snap open, broke the plastic plunger that protrudes through the door jam, so now the dome lights just stay on all the time. This is bad news, as it means the passenger side panel will need to be removed. To remove the side panel, the seat will probably need to come out. It seems like every time something is fixed, something else gets broken. 


PASSENGER SIDE DOME LIGHT SWITCH

Eventually I will get everything working but am certain the mild days are running out this winter. My garage is small, so it is much easier to work on the Fiero outside and it is discouraging that when one problem is fixed, another crops up causing me to have to disassemble the interior further. 

Until next time,

Randy 

Sunday, December 6, 2015

GLOBAL WARMING

As gas prices have been falling, (Currently $1.79 in my area of Ohio) the other reason to own an electric car is to help the environment. It is December 6 and warm enough to work outside on the Fiero in a sweatshirt. Ok, so maybe there are some benefits to a warming climate! You know I am just joking but it was a beautiful December day in Central Ohio! The nights have been cold with frost in the morning but by about 10 am, the temperature is in the high 50s, so I was able to get a little more work done on the Fiero instrument cluster both Saturday and Sunday.

The final 3 wires were spliced on the D-Sub connector and after a little fumbling around trying to remember how it went into the housing, was finally able to get it back in the car and plug in all of the connectors. The duel meters light up but are just reading zeros. These duel volt/amp meters are inexpensive but are produced in China with very poor documentation, so on the pack meter (I checked to make sure there was voltage before I made the connections) the negative and positive must be switched. I did not check the 12 volt lead voltage on the low voltage meter, so I suspect that is the problem on that one. Even though the faces of the meters look the same, the connections on the back are different and I have read in some of the forums that even the same model meters sometimes do not have the same connections from batch to batch. I am getting closer so hopefully someday, the meters will work correctly and actually read volts and amps! The good news is the speedometer lights are working, but on the downside, now my dome lights are not shutting off when the doors are closed and the parking brake light stays on all of the time. Did I ever mention I hate automotive wiring!


INSTRUMENT LIGHTS WORKING!

Every weekend day that is warm enough to work out side is a true blessing but I know this will not happen much longer, so really need to get all of the Fiero lighting and metering working soon. 

My wife had been bugging me to get her SLK 230 headliner recovered and stopped into JoAnn Fabrics to find out if they carry any headliner fabric. To my surprise, they did but I also found some black vinyl that had a really cool pattern in it that I may try. I think it would be easier to clean and would give the car interior a classy look, so may just stop back and pick some up.

Until next time,

Randy

Sunday, November 29, 2015

BACK ON TRACK

With the Thanksgiving weekend here, I was hoping to actually get the instrument cluster back in the car but with traveling to my parents and helping the wife clean the house, just didn't get that far. The instrument cluster has been rewired and assembled though and all that is left is to rewire the power leads inside the car.


METERS ILLUMINATED 


D-SUB CONNECTOR ATTACHED

If I can get a warm evening or weekend, the interior wiring will be able to be completed and the instrument cluster can be installed and once this is completed, there is a little bid of interior work to do then think the focus will turn to eliminating the power headlights. There is an older Buick headlight assembly that will fit into the opening and then a Lexan cover is made to cover the opening and act as the lens. This will give the car a better look and eliminate the power headlight intermittent operation problem. 

Until next time,

Randy 

Sunday, November 22, 2015

OH NO......SNOW!

There is always a day in spring when the weather breaks and work on the Fiero can be done outside but on the other side, a day in the fall when the car has to be  pulled back into the garage to continue; Today is the latter.


SHOW ON THE PORCH RAIL

The instrument panel was assembled and some final tests were being done on the d-sub connector, that is being used, when the ends of the test leads touched each other, while checking voltage between pins. One of the pins was vaporized and the wiring connections under the center console were damaged. When the center console connections were uncovered, one side was badly blackened. Currently new wires are being run under part of the console that can not be accessed.

Another problem is that while the meters being used are the same size, they are made by different manufactures, meaning the shunt and voltage pins are different on each of them. When making up the d-sub connector for the external wires, care must be taken to connect the correct external wire to the correct wire going to the meter, as the plugs for the different meters look the same but the reading actually goes to different pins on the respective meters.


WR-005 METER

    
YB27VA METER


DIFFERENCE IN PLUGS

When reading other blogs, a great amount of respect is growing for these builders. One builder in particular is Fred Behning. He too is reworking his instrument panel  and with the level of complexity involved, completed it in record time. You can take a look at his work in his blog post: 


A Pinch of This, A Dash of That


After the Fiero was completed to take to EVCCON, it has been a little hard getting motivated to clean up some areas that don't satisfy me. My wife and had Chinese dinners the other night and the reading on the fortune cookie really struck home.


FORTUNE COOKIE

My posts will probably slow down through the winter but work will continue, so until next time, thanks for following my blog!

Randy 

Sunday, November 8, 2015

IT COULD BE WORSE!

The other day when the meter leads shorted between the pack battery pins on the d-sub connector, I thought it just damaged the connector but when I went out to work on it today, found that there was no voltage on the wires. After taking part of the center console apart, I could see a wire had come off of the console connector. The easiest way to repair it is to just pull some new wires through the center console and reconnect them to the wires going to the meters.

Sometimes I think I have all the bad luck but this morning when checking the EVTV Page for a new show, found that Jack had a battery fire on Saturday in a Better Place Pack. Seems it ran down too low and when he charged it back up, went ballistic! So when things are not going good on my Fiero build, it is always good to reflect and realize it could be worse. I do have Better Place cells, so will need to make sure they do not run down or overcharge.


EVTV FIRE

Until next week,

Randy

Saturday, November 7, 2015

DEJA VU

When the duel volt/amp meters were first installed in the Fiero, I burnt up the DC-DC converters several times and the same with the meters. This time was no different, as I have ordered more DC-DC converters twice but have not had any issues with the meters. I have never been diagnosed but have all of the symptoms of dyslexia! I look at a schematic and then wire the components backwards sometimes, so have gotten in the habit of checking things two or three times before finally soldering or assembling a circuit. I was finally able to assemble the d-sub connector with the 12 volt power and get the meters to light up. A d-sub connector pin crimper was purchased and is working well. If all of the pins are connected to the wires first, then it is easier for me to make sure they are all inserted in the correct positions in the connector housing. The latest connector has just one wire going to the d-sub pin and the two wires were left long enough to be inserted in both of the MTA-100 connector assemblies.


NEW 12 V CONNECTON


NEW D-SUB CONNECTOR CONFIGURATION

Tomorrow the d-sub that I burnt up while trying to read voltage across the pins will be replaced and I am going to use the crimped pins to assemble it. This time, I am going to put electrical tape on each pin after it is crimped to the wire to make sure they do not touch each other. I still need to take voltage readings to make sure to insert the pins into the d-sub connector housing properly but will take proper precautions this time. I really hate having pack voltage coming into the interior of the car but it would need to use either a resister or a circuit to proportionally reduce the voltage going to the meters to avoid it.

Hopefully another post tomorrow,

Randy

Wednesday, October 28, 2015

MOUNTING THE D-SUB CONNECTOR

Since the 12 volt DC-DC converter quit working, another two were ordered from Light Object. While waiting on them to arrive on Friday, I decided to work on mounting the d-sub connector. As the metal on a computer where these connectors are usually mounted is much thinner than the plastic case of the instrument, they would not mount up with the coupling nuts that are typically used. The female connector had to be mounted to the outside of the housing and the holes on it, had to be threaded to 6-32 threads. Then 6-32 studs had to be made from some small brass bolts to screw into the connector holes with nuts installed on the inside of the housing. This should give me a solid mounting of the female half of the connector and will allow me to plug the male half in and then fasten it with two more screws on the outside of the housing. 


TYPICAL D-SUB STANDOFF


OUTSIDE OF THE CASE VIEW


INSIDE OF CASE VIEW

The addition of the screws on the inside of the case will probably require that a little more of the cluster light dividers be trimmed but I am getting closer to having the it all back together and back in the car.

More this weekend,

Randy

Monday, October 26, 2015

NO BODY TOLD ME

Yesterday evening the instrument panel was tested and true to form, the dual panel meters did not light up. Monday after taking my wife to the doctor, I started trouble shooting the wiring and found that the bottom four wires on the female connector were backwards. No problem, just unsolder and put them back in correctly. A couple of the extra male prongs from the crimp d-sub connector were used on a 9 volt dc adapter to plug into the d-sub female connector on the new wiring harness but the panel meters still would not power up. Voltage readings were taken on the exposed metal on the top of the IDC connectors and there was no voltage, so on looking up the IDC  (insulation displacement contact, found that an insertion  tool is required. After looking around the garage I decided to try to use a male spade connector and was able to stand up the IDC connector and after aligning the spade up on the wire, was able to tap it with a hammer until you could actually feel the wire insert into the slot.


2.54 MM to IDC CONNECTOR

Great, time to try again, just wish the guy at Mouser would have told me you needed an insertion tool when he recommended the connector. This time, one meter lit up so the DC-DC converters were switched and sure enough, the other panel meter lit up and must have been damaged when the wires were desoldered. These DC-DC converters seem to be very delicate, so I order them by two so I will always have a spare.


ONE METER LIT

I really wanted to get the instrument panel back in the car this weekend but at least I am getting closer. 

Until next time,

Randy

Sunday, October 25, 2015

JUST ANOTHER BUSY SUNDAY

This morning I slept in until 8am, as I had waited for EVTV to load and did not get finished watching it until 3am. Saturday female d-sub connector was made up with the wires coming from the traction and 12 volt batteries, in addition to 12 volt switched power for the instrument panel digital volt/amp meters. The connector just did not turn out good. I can't see, haven't soldered for some time, and was really never good at soldering anyway, so the d-sub connector looked like crap!


D-SUB FEMALE CONNTECOR


FIRST ATTEMPT OF SOLDERING

As you can see, solder flowed onto the flange and I burnt the insulator between the pins. Not real pretty but I guess, it was good practice.

The first thing Sunday morning, a trip was made  back to Radio Shack to pick up another d-sub female and also a male connector, as the store I went to Saturday did not have the male. Radio Shack is high for these connectors but I wanted them this weekend and of course, there is not shipping charge if they are picked up in the store. Ok, I had the connectors I needed but also picked up some thinner gauge solder as this should help with the solder overflow onto the connector flange. The second problem I had was my inability to see the little connector where the wire needed to be soldered, so made a trip to Dollar General and picked up some stronger reading glasses to magnify the connector when it is being soldered. 


READING GLASSES 

It turned out being a beautiful day in central Ohio, so to help with seeing the solder joint, a little work bench was set up on the Better Place box that is sitting outside my garage so I could work in sunlight. To make sure I wasn't missing something, a Youtube vides was watched and I did pick up the tip of putting a spot of solder on the iron first and then putting it on the joint to transfer the heat to the connection. Everything worked, as my second attempt resulted in a much better looking connector.


FEMALE D-SUB CONNECTOR 2ND ATTEMPT

Now onto the male connector inside the car. By now I was getting a little more comfortable making the solder joints and in no time, had all of the connections made.


D-SUB MALE CONNECTOR

So as to keep with the tradition of going out to the garage, falling down drunk and playing with high voltage, a break was taken and I had a couple of  Stone Ruinations. Ok, I wasn't falling down drunk but 2 out of 3 ain't bad!


STONE BREWERY RUINATIUS

After my little break, I am going to start reassembling the instrument cluster, so may post later tonight.

Thanks for stopping by,

Randy

Sunday, October 18, 2015

FABRICATING THE MOUNTING FOR THE VOLT/AMP METERS

Saturday my wife and I met my family in Coshocton to go on the Fall Foliage tour. We skipped the last two farms on the tour and went to the Roscoe Village Apple Butter Stirring Festival. That pretty much took up Saturday so no work was done on the Fiero.


ROSCOE APPLE BUTTER STIRRIN'

Sunday morning was chilly but started warming up around 9am, so it was time to start on reworking the instrument cluster to incorporate the Volt/Amp digital meters. Right off the bat, I could not find a socket or nut driver that fit the small screws holding the face plate on, so drove over to Ace Hardware in Baltimore, OH to pick up some tools. Before EVCCON I picked up a 1/4 inch drive metric socket set so after finding out the socket I needed was 7/32 picked up a 1/4 inch drive, inch socket set and some inch nut drivers. 

Templates were made for the face plate to mount the meters and the terminal spacing to plug into the existing contact clips that were removed from the instrument cluster that origanally came with the car. The hole locations were transferred to a piece of aluminum sheet metal and were drilled out, then a template was made for the meter and was cut out on the plate with a Dremel cutoff wheel. The plate edges were cleaned up and the meters were tested for fit.


METER MOUNTING PLATE

Then focus turned to making a contact plate so the original contact clips can be used to connect the meters. The holes from the template were transferred to a piece of plexiglas and were drilled out. After another trip to Ace Hardware, brass screws were located in the holes and screwed into place. The contact plate fit like a glove and should work out great.


OLD CLUSTER WITH CONTACTS REMOVED


NEW CLUSTER WITH CONTACTS


STUDS ON BACK OF TEMP AND FUEL GAUGES


CONTACT PLATE


CONTACT PLATE MOUNTED


FACE TEST FITTED

The dual Volt Amp meters are not isolated, so I have to use a 12 volt dc-dc converter to power one of them up to make sure the pack negative is not tied to the 12 volt negative. The leads on the dc-dc converter are very small and require soldering the wires onto them. This can be done but twice not I have had a solder joint fail and the wire come loose, causing the meter not to work, so found a connector that the dc-dc converter will plug into that has connections that you push the wire on to connect them. I believe this will be a much more reliable way to connect the wires to the DC-DC converter and will make the operation of the Volt/Amp meters much more reliable.


DC-DC CONVERTER CONNTCTOR

Next weekend the wiring will be started so I am digging up the instrument cluster schematics and diagrams to find the wires that will need to be spliced to be able to use the original connectors.

More next week,

Randy