This is the third Better Place Module that I have had the privilege to bottom balance and must admit, after seeing the aftermath of the fire at EVTV, am being a bit more cautious. When bottom balancing the Better Place Modules, they are always on a furniture dolly, so they can be quickly wheeled out into the driveway should anything go wrong.
As I described in my last post, the process is started by finding the lowest cell and then hooking up two 1000 watt halogen flood lights and bringing them down until the lowest cell is 2.9 volts. The lights are then disconnected and another voltage reading pass is taken to make sure that is still the lowest cell. The volt meter is then moved to the new lowest cell or left as is, if that is still the lowest cell. Then a 40 watt light bulb is used to draw the cell voltage down to 2.75 volts. Once the cell is down to 2.75 the light bulb is turned off and another voltage pass is taken to make sure that is still the lowest cell. Then a 5 watt light bulb is connected to the module and left on until the lowest cell comes back down to 2.75. This is the stage I am currently in, as once the 5 watt bulb is connected, the voltage starts coming back up and often goes close to 3 volts before it starts coming down again. I started this yesterday morning and after 25 hours of discharging, still do not have the low cell stabilized to 2.75 volts.
When the cells are drained, they seem to always drift back up but when they are charged seem to always drift back down in voltage, so once I get the low cell down stabilized at 2.75 volts, I start charging them all back up to 2.8 volts or what ever voltage the highest half cell is resting at. Remember, the Better Place cells are LiMn2O4, not LiFePo4 cells and operate at a higher voltage range, so when they are down to 3 volts per half cell, are pretty much depleted. My controller is set to cut off at 90 volts or around 2.8 volts per cell, so the module should never discharge lower that that.
While the module is being discharged, a post it note is stuck to my laptop to remind me and I check the module every half hour or so. I have found that since the LiMn2O4 cells are so "bouncy," the best way to get them to stabilize below 3 volts is to discharge at a very low level when approaching the desired low voltage.
Also, measurements were taken in the nose of the Fiero and the module will fit, so am thinking about how to mount it. To get the module in from the top, the hood will need to be removed but this may be the best way to install it.
Until next post,
Randy
Showing posts with label EV Conversion. Show all posts
Showing posts with label EV Conversion. Show all posts
Sunday, February 28, 2016


Sunday, January 24, 2016
COOL TWIN MOTOR SETUPS
Not much going on with the Fiero build but while scanning Facebook, came across a very cool twin motor setup that would look very good in a hot rod build.


Also found a very clean looking dual AC motor set up that EV West put in a VW van.

Spring is not that far away, so am looking forward to getting back to work on the Fiero!
Randy
Sunday, January 10, 2016
FIRST SNOW
This winter has been unseasonably warm so far and last week the temperature reached 50 deg one day but finally Old Man Winter is catching up with us!

FINALLY, SNOW IN CENTRAL OHIO
With the holidays, not much progress has been made on getting the voltage and amp meters finished and the interior put back together on the Fiero but today, new splash shields were ordered from the Fiero Store, for the engine compartment.

ENGINE COMPARTMENT SPLASH SHIELDS
A bluetooth keyboard and mouse were purchased for the Dell Venue 8 Pro, so while the center console is out of the car, may change the tablet mounting so the keyboard can be incorporated and also to raise the tablet high enough so the camera will clear the dash to get video of drives.

BLUETOOTH KEYBOARD AND MOUSE
The garage is cold, so I have been spending most of my time working on getting parts and developing a plan for work on the Fiero when the weather breaks. Below is a picture of me sitting by the computer with my build assistants Apollo (cat) and Chloe (dog.)

ME AND MY BUILD ASSISTANTS
Thanks for visiting,
Randy
Thursday, December 31, 2015
2015 BUILD REVIEW (SECOND HALF OF THE YEAR)
By the middle of August, the battery modules had been matched and connected together in parallel. In addition, a TCCH PFC-3000 charger was installed and the car was driven fellow EV builder, Brian Couchene's house, the longest distance the car had been driven to date. Brian's father was visiting, so we took a ride up and down the hilly roads nearby . The Fiero was actually able to climb the steep grades in fourth gear, which was very impressive.


08/02/15
By the beginning of September the Fiero was pretty much ready to take to EVCCON, the plastic side trim and lower bumpers were sanded and painted satin black, and the car was professionally detailed.


NOVEMBER 29, 2015


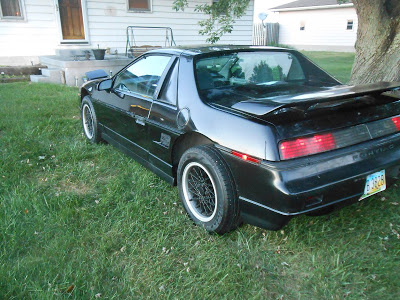
SEPTEMBER 9, 2015
Shifting was still erratic, so a set of new bushings were ordered for the shift lever from Rodney Dickman. The instructions clearly stated to be careful not to break the aluminum shift bracket but the pin would not budge and finally when I thought it did, found that the shift bracket had snapped. This was not good, with only a few weeks until EVCCON the transaxle could not be shifted. I got on Thumb Tack, found a couple of welders in my area and finally talked one of them into welding the shift bracket on short notice. The job was a very professional and sturdy fix, so i was able to get the shift linkage hooked back up. The new bushings took the play out of the shift bracket but shifting was still erratic and seemed to come out of adjustment after a few shifts.

SEPTEMBER 16, 2015
The last improvement made before EVCCON was a new vacuum pump. The one that came with the car was very noisy but I found a smaller one that is rather quite and operates the power breaks just fine.

SEPTEMBER 21, 2015
A week before EVCCON, Jack Rickard announced it was canceled this year because he could not secure insurance for the venue. Shortly after the announcement, it was announced that there would still be an open house at the EVTV Garage for anyone interested in still making the journey. Tuesday morning, September 29, 2015, Brian Couchene arrived at my house with his tow dolly, the Fiero was loaded, and we were off to EVCCON!

SEPTEMBER 30, 2015
Upon returning home from EVCCON, I went to work on all of the problems that turned up from driving the Fiero around Cape Girardeau for a week. The right side instrument lights were not lighting up and the 12 volt digital meter in the instrument panel quit working so a new instrument cluster was purchased, along with a new ignition switch.


OCTOBER 7, 2015
By the end of November, the instrument cluster was finally rewired using a D-Sub connector for the digital volt/amp meter wiring, and was ready to be installed in the Fiero. The steering column had been dropped and the new ignition switch was installed.


By the beginning of December, the instrument panel was back in the car with the lights and meters working.


DECEMBER 13, 2015
So this is pretty much the year in review, pretty much right back where I started. With the weather finally turning cold, there will probably not be much more progress until spring. The guys at work are wanting to see the car but I do not want to chance driving it into Columbus, OH until the third module is installed, just in case I am not able to charge at work. While the interior is torn apart again, I will remove the passenger seat to paint the frame work and to pull off the interior panel so the light switch on the door can be replaced.
Thanks for visiting my blog this year!
Randy
2015 BUILD REVIEW (FIRST HALF OF THE YEAR)
It is ironic that 2015 started with wiring the console and actually ended with that also. After you start driving the conversion, you always find things that you are not satisfied with and end up having to go back and rework them. I guess this goes back to your original engineering and planning, so this will go down as a lesson learned for future builds.

JANUARY 3, 2015
By the end of March, the interior was finally back together and actually turned out pretty good. The heater controls were wired to be able to turn the heat on and off with the temperature slider, the Venue 8 Pro tablet was mounted to be able to view the Synkromotive Motor Controller user interface, and all of the meters were reading properly.

MARCH 29, 2015
By early May, I had installed LED dome, instrument and headlight lamps to help cut the power required to drive at night and I must say, was rather impressed with the LED headlamps.

MAY 9, 2015
By the middle of May, the Fiero could be driven and with one of the Better Place modules, had around a 25 mile range using 251 watt hours/mile.

MAY 12, 2015
As a precaution, a JLD 5740 meter and ABB contactor were installed to be able to disconnect the 240 volt AC power to the charger when the charge reached a predetermined level. This was just to give me a little piece of mind that if the charger control did not turn off or tried to float charge, the ac power would be cut off to it.


MAY 31, 2015
Side panels and a floor were fabricated to enclose the front trunk compartment and the second module was modified and mounted in the front of the car before conduit was mounted under the car to protect the power cables. The second module was finally installed, effectively giving me a 50 mile range.


JULY 31, 2015
Friday, July 24, 2015
MORE PROGRESS ON BATTERY MODULE
This week the other two end plates were cut out and the terminals arrived from EBAY, so with any luck, the second battery module will be ready to install this weekend.

END PLATE WITH TERMINAL

ALUMINUM ANGLE HOLD DOWN
Finishing the calking and trim painting of the patio door off of the dining room has been taking up some of my time but was finally able to get a little done on the Fiero this week. The weather is supposed to ge great this weekend, so hopefully I will be able to get the second module installed in the car. The voltage on the second module will need to be matched with the first module, then can be connected together.
Thanks for visiting,
Randy
Sunday, June 29, 2014
ANOTHER DAY
Yesterday, the 12 volt system volt amp meter stopped reading voltage, so I got out the volt meter to trace out the 12 volt line and found it had no power. I am getting power from the cigarette 12 volt source, so upon checking the fuse, found it blown. After replacing the fuse, the meter started working properly.
An aluminum plate was also made to mount the meters in and will be attached to the speedometer glass. This will cover the gaps and make a cleaner mounting for the meters.
The driver's side door panel was cleaned and a fresh coat of medium gray interior paint was applied, with the arm rest getting a coat of charcoal gray. A little carpet cleanup and the door panel will be finished.

DOOR PANEL PAINTED
Also, some time was spent on the internet ordering new outer window seals and researching how to install them. The diagram below is courtesy of Michigan Fiero Club.

FIERO DOOR DIAGRAM
The trunk was also hosed out to and I am going to take some measurements, as the battery module would be easy to fit in the bottom and a floor could be fabricated that would still give the car some trunk space. This may be the easiest place to put the Better Place Module and will still keep the center of gravity low. I just want to make sure there is a place to put groceries or packages as the car only has two seats and no space in the cabin for cargo.
Thanks for visiting,
Randy
Thursday, January 2, 2014
INTERESTING CONVERSIONS ON YOUTUBE
Since starting to re-build the Fiero last year, I have looked for other builds to follow to look for ideas for my car.
EDMEVMEDIA is documenting the conversion of a Mazda Miata and usually updates their progress every couple of days. Their videos have covered everything from bottom balancing their cells to making mounting brackets, installing components, and running wiring.
JDDCIRCUIT is documenting the development of soft and hard ware to run a Prius electric motor and install it in an MR2. This work is major as the Prius drivetrains are readily available and from the videos, it appears the half shafts are the same on the Prius and MR2, making for an easy drivetrain conversion.
If you are converting a car or plan to in the future, these active build videos will prove very useful for you. I encourage you to show support and add their Youtube sites to your favorite list.
Happy Converting,
Randy
EDMEVMEDIA is documenting the conversion of a Mazda Miata and usually updates their progress every couple of days. Their videos have covered everything from bottom balancing their cells to making mounting brackets, installing components, and running wiring.
JDDCIRCUIT is documenting the development of soft and hard ware to run a Prius electric motor and install it in an MR2. This work is major as the Prius drivetrains are readily available and from the videos, it appears the half shafts are the same on the Prius and MR2, making for an easy drivetrain conversion.
If you are converting a car or plan to in the future, these active build videos will prove very useful for you. I encourage you to show support and add their Youtube sites to your favorite list.
Happy Converting,
Randy
Subscribe to:
Posts (Atom)